
bit of a project thread
Page 1 of 3 • 1, 2, 3 ![]()

bit of a project thread
![]() by johnnyboy666 Wed Jan 15, 2014 11:02 pm
by johnnyboy666 Wed Jan 15, 2014 11:02 pm
Sooo I'd been crawling ebay and gumtree for months trying to find a pickup, originally I was after a bedford rascal, but even rotten examples seem to go for over the odds these days. I nearly won a supercarry pickup on ebay, I was the second highest bidder and then the winner didnt turn up to fetch it, but then he did, so didn't get it. In hindsight, it looked a bit like it might suffer from tin worm, maybe I dodged a bullet?
Then I nearly bought a hijet pickup on gumtree that was halfway through an lpg conversion, but as it was un-driveable, I couldn't manage collecting it without going way over budget, it looked like it would've been a perfect base, having been a grounds vehicle at a college most of its life.
So a few months later I spot this one on ebay, looked relatively straight in the photos and had been resprayed at some point. Only downside was that it was a diseasel, but I decided I could live with that.
I forgot to bid and it went for pretty cheap, so I messaged the seller (knowing that most people drop out of vehicle sales on ebay) and surprise surprise, they did drop out, and he said come and fetch it next weekend.
After a bit of a cock up booking the train I eventually managed to book another one that got me there before the post office closed so i could tax it. 4 and a half hours after I set out I met the bloke and he gave me a lift to the post office (yes, you read that right, I taxed it before i'd even seen it) then off down some windy lanes to the arse end of nowhere to his house.
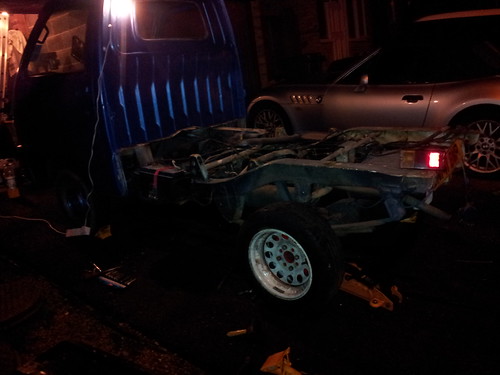
where I'm greeted by this little beast:
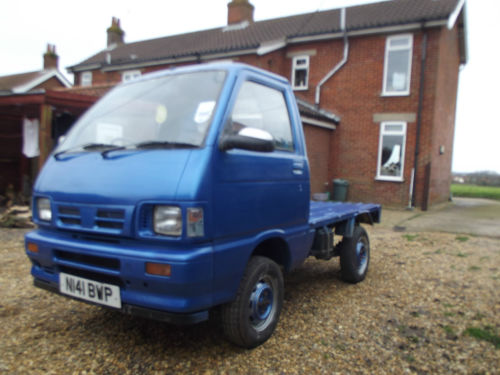
kkjhkjhkjh by johnnyboy666, on Flickr
which some of you probably saw on ebay
And lets just say, it aint as pretty as the photos make out when you get up close!
after a bit of a tinker to get the back lights working correctly and a chat with the bloke about a 1/2 scale steam engine he was building over a coffee, he bid me a safe journey (he was amazed that I was actually going to drive the thing back) and off I went on my 150 mile trip across the country.
after a bit of stiring porridge trying to figure out where the hell the gears were, I swiftly realised I didnt know where I was going. the pickup doesnt have a lighter socket so I couldn't bring my satnav (its old and the battery last about 10mins tops without charge) so i had downloaded a satnav app on my phone and brought some spare batteries with me. Of course being out in the middle of nowhere, i couldnt find a gps signal, so had to sit in a layby for 20 mins whilst it sorted itself out. It was at this point I realised that I couldnt get into revers at all, so if i took a wrong turn I had to find somewhere to swing round. Good job these things can turn round on a 5pence peice.
The drive home went pretty well, no overheating (although Im not sure how accurate the temp guage is) and just a slow flat to cause me to pull over into a garage to inflate it (but the machine didnt work so I just took it easy the last 25 miles or so)
I got home about 12 hours after I left the house, absolutely gagging for a piss because I didnt want to stop incase I couldnt get it started again (didnt need to worry, it starts first time)
and heres how it stood when I got back:
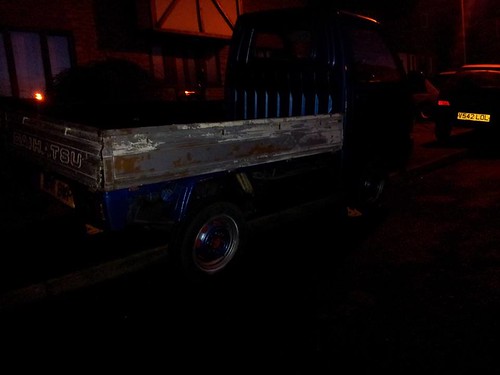
1506435_10152116872149501_1547471821_n by johnnyboy666, on Flickr
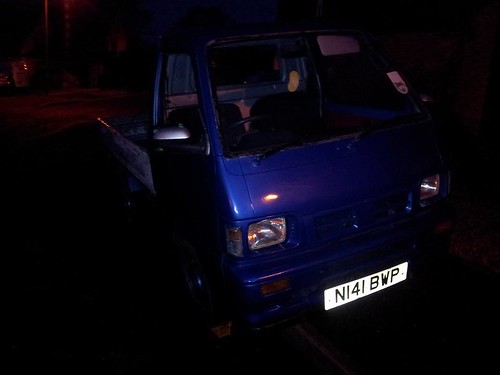
1535688_10152116872354501_1971522648_n by johnnyboy666, on Flickr
Current faults that I am aware of:
-Stevie Wonder did the paintwork (its on the tyres, the windows, runs and wrinkles everywhere)
-Stevie wonder laid the carpet
-door cards have been recovered, and now dont fit on properly
-speakers have been screwed into doorcards
-window winders missing
-all door trim/handles loose (hard to close the door!)
-drivers window seal half missing
-passenger window scraper broken
-most of the dash has been taken apart and put back together wonky and loose
-seats are loose
-gear lever mechanism has play
-tyres are just legal
- wiring bodges everywhere, back lights and cd player especially bad. Random wires around battery
- massive battery fitted, there was a metal strap on it when i set off, there wasnt when I got back (im amazed it didnt fall off!)
- smoky on start up, possible glow plugs, although it wasnt as bad when i started it today, so might just be old fuel causing it
-exhaust blowing either at manifold or downpipe
- no spare wheel (not sure if it should have one as standard)
-handbrake cables rusted through
-diff whine on lift off at high speed (i think a little bit is normal with these? seems worse when up to temp)
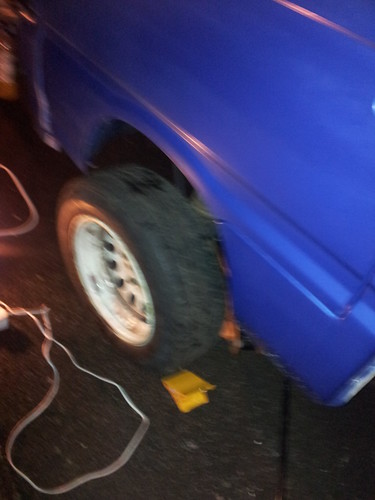
-hideous wing mirrors were held on with one bolt and the glass was flopping about. have stuck a bike mirror on for a temporary measure
I've got my hands full with this it would seem. The reason I bought it is so I can do some work on my peugeot 205 without having to squeeze it into a weekend. And also to stop using the 205 to drag spare engine etc about in. But I'll need to make sure this is reliable before I start driving it to work, and that means I need revers gear to get out of the carpark!!
I've got some service parts ordered, off to the scrappy on saturday to see about some window seals and a lighter socket.
I'm going to be fitting a snorkel (like on 4x4s) for two reasons, firstly there doesnt seem to be much clean air way down under the dirty dirty diesel engine and a bit more fresh air couldn't hurt, and secondly the insurance policy i'm using for the pickup is a modified policy for 4x4s, off roaders and green laners, and a stipulation is it MUST be modified. This little trick saved me £140
I'm contemplating wider wheels on the rear (probably getting a standard pair banded) and possible some chunky off road tyres (25x10 12 seem like they might work with custom mudguards)
Probably wider wheels on the front as well with a lower profile tyre, to give more arch clearance.
I may well make a new exhaust system with an extra silencer in it, to quiten down the noiseyness, its likely to be made out of repurposed peugeot exhausts, as they are cheap, and I have some bits lying around. I'm also toying with the idea of an upright tractor style end box, up the rear of the passenger side of the cab
Coilovers planned for the front, and I've got a few long term goals for the rear (google 4 link suspension for an idea) but for the time being I'll be reversing the leaf spring eyes
I would like to add an extension on the rear to be able to carry a motorbike, but the bike is way off beig finished yet, so I'll cross that bridge when I come to it
I'll be repainting it myself at some point, I'm just trying to find a nice retro colour to do it (it will be dome with brushes/roller most likely!)
I get the feeling i've waffled on a bit. Hopefully, I'll keep this updated as I go along, so watch this space
johnnyboy666- Centurion
- Posts : 163
Join date : 2013-10-16
Location : Derbyshire


Logi- Jet Warrior
- Posts : 3662
Join date : 2011-04-07
Age : 88
Location : Kilmarnock
Re: bit of a project thread
![]() by FrontBackSide2Side Thu Jan 16, 2014 6:54 am
by FrontBackSide2Side Thu Jan 16, 2014 6:54 am
I saw that one on gumtree and phoned up about it too but it put me off as it sounded like it had been taken apart and was probably missing bits and pieces plus i thought i might end up having to remove the LPG kit and undo all the modifications they had made to make it fit
FrontBackSide2Side- Cinquecento
- Posts : 584
Join date : 2013-10-04
Age : 41
Location : Kidderminster

xxemaphorr- Centurion
- Posts : 177
Join date : 2010-04-08
Age : 39
Location : Scunthorpe

craig2859- Centurion
- Posts : 133
Join date : 2013-02-13 -

Re: bit of a project thread
![]() by rich the mechanic Fri Jan 17, 2014 7:59 pm
by rich the mechanic Fri Jan 17, 2014 7:59 pm

rich the mechanic- Jet Addict
- Posts : 1824
Join date : 2010-01-03
Age : 44
Location : Essex -
Re: bit of a project thread
![]() by johnnyboy666 Sat Jan 18, 2014 12:42 am
by johnnyboy666 Sat Jan 18, 2014 12:42 am
I've got a pair of handles for the windows now too, some nice aluminium ones which were going cheap on ebay because theyr'e a nasty colour. Nothing a quick lash of paint wont sort. I wouldve got some standard ones, but the previous owner was using mole grips to wind the windows down, and mangled the splines a bit. These winders have got little grub screws to help the situation
Also Ive been doing a bit of research on tyres and potential suspension options, so watch this space..
I might post a few pics of my car and bike at some point to give you a hint at the way this project might go. I made a custom suspension linkage for the bike so I could use a specific shock, just because I wanted to (and somebody told me I couldn't). And I reworked the shell of the car to fit a specific set of wheels and tyres (currently the widest track width Peugeot 205 in the world as far as I know) again, just because I wanted to and was told it wasn't possible.
and yes I fully intend to bolt the rear wheels of the car onto the hijet at some point just for a photo oppertunity, they are very wiiiiide! unfortunately they're 4x10⁸ so probably wont be taking it for a spin with them on
johnnyboy666- Centurion
- Posts : 163
Join date : 2013-10-16
Location : Derbyshire
FrontBackSide2Side- Cinquecento
- Posts : 584
Join date : 2013-10-04
Age : 41
Location : Kidderminster
Re: bit of a project thread
![]() by Logi Sat Jan 18, 2014 9:58 am
by Logi Sat Jan 18, 2014 9:58 am
Hope that helps
Logi- Jet Warrior
- Posts : 3662
Join date : 2011-04-07
Age : 88
Location : Kilmarnock
Re: bit of a project thread
![]() by johnnyboy666 Sun Jan 19, 2014 2:38 pm
by johnnyboy666 Sun Jan 19, 2014 2:38 pm
Very busy day yesterday, including an almost breakdown in the pickup!
I'll be back later today or tomorow to write an update with plenty of pictures, and bagload of questions for you experts (fingers crossed a few of you are familiar with the diesel engine)
johnnyboy666- Centurion
- Posts : 163
Join date : 2013-10-16
Location : Derbyshire
Re: bit of a project thread
![]() by johnnyboy666 Wed Jan 22, 2014 9:16 pm
by johnnyboy666 Wed Jan 22, 2014 9:16 pm
Makeshift mirror

got a full window trim off a vectra or something, should be good enough to keep the howling wind out, although winding the window all the way up seems to poke it in a little bit, but its much better than the non-existent one before
got a window scraper/slider thing (the bit at the bottom of the window) off something, almost a perfect fit after a tickle with some tin snips
Also notice in this photo the terrible attempt that had been made by the previous owner to bond some mirrors on at some point
Flaps down!!

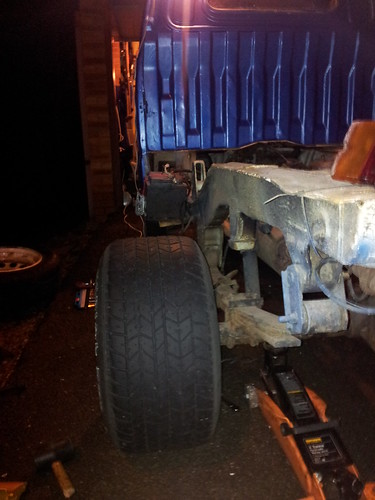
I decided in order to get decent access to everything, I'd be best removing the bed, started getting dark around this point, but on I go
I now know how these little pickups manage to be so heavy, the bed weighs a bloody ton!! I really struggled lifting it by myself and bent both mudguards (but I'll be cutting those off anyway, and replacing with something better looking)
Trying a few wheels out for size. First, 13x6 steelies
and on the front (sorry crap photo)
and now for a bit of width. my 13x10 steelies!
I seem to have forgotten to take any decent side of photos of these, but they looked pretty insane!
With the 6s on the front and the 10s on the back;

Again, the photos dont really do it justice
also been sorted out the snorkel, but didnt take any photos of that.
Whilst in the process of doing that I realised that the air feed hose that attaches to the airbox, attaches directly to a pipe welded to the chassis rail, as if it uses the chassis as part of the air feed. I couldnt figure out where the air could get into it though, so maybe with that changed, it might feel a little less strangled!
Ive changed the air filter, got an oil filter and oil to change next weekend, and have ordered a fuel filter.
See my rant in my other thread regarding the bloody gear stick assembly!
I've half finished fitting a lighter socket as the original has been removed. But I have moved it up onto the dash, so its easier to plug the satnav in.
Ive made some inquiries about custom build coilovers for the front and the price wasnt as SHOCKING (get it?) as I was expecting, so i think things should progress with that pretty quickly. and if all goes well, I might look into getting more made up for anybody on here that might be interested.
I intend to have them built with some negative camber build in to aid handling, as I have noticed that my pickup seems to have some positive camber, which aint a good thing in my books, although I suspect its because its not got a lot of weight on it at the moment
ooh yes and I almost forgot to mention, I nearly broke down! On the way back from the scrappy, I was going as fast as I could (didnt have the satnav so no idea how fast) down the dual carraigeway, and just coming up to my junction, the power started to drop off, to the point of the engine dying when I stopped to give way at the first junction after the dual carriageway. I tried to start it up again, and it wouldnt start the first two times, but just about caught the third time, but the oil pressure light was flickering!! I have noticed it flicker ever so slightly when the rev drop a bit too low, so i tired to rev it up a bit, but the accelerator pedal did nothing! I thought the cable might've snapped but it was working fine, so I just left it to tick over for a few minutes, gently trying the accelerator now and again, and eventually it perked back up and was fine for the 3 miles back home.
A full investigation of the oil system will be done when I get the chance, i think the pressure regulator valve I pointed out in another post might have something to do with it, theres also a slight oil leak somewhere
thats all for today folks
johnnyboy666- Centurion
- Posts : 163
Join date : 2013-10-16
Location : Derbyshire
Re: bit of a project thread
![]() by FrontBackSide2Side Thu Jan 23, 2014 2:45 pm
by FrontBackSide2Side Thu Jan 23, 2014 2:45 pm
Are those 13x6's ford fitment with -7 ET?
FrontBackSide2Side- Cinquecento
- Posts : 584
Join date : 2013-10-04
Age : 41
Location : Kidderminster
Re: bit of a project thread
![]() by johnnyboy666 Thu Jan 23, 2014 3:17 pm
by johnnyboy666 Thu Jan 23, 2014 3:17 pm
Is there any difference between early and late front struts? Or van vs pickup? I know the 4x4 differ
They are ford fitment, cant remember the offset, but could well be.
They're made by a company called weller, as are the 13x10s and ive got a pair of 13x8s too
johnnyboy666- Centurion
- Posts : 163
Join date : 2013-10-16
Location : Derbyshire
Re: bit of a project thread
![]() by FrontBackSide2Side Thu Jan 23, 2014 3:55 pm
by FrontBackSide2Side Thu Jan 23, 2014 3:55 pm
FrontBackSide2Side- Cinquecento
- Posts : 584
Join date : 2013-10-04
Age : 41
Location : Kidderminster
Re: bit of a project thread
![]() by johnnyboy666 Mon Feb 03, 2014 7:35 pm
by johnnyboy666 Mon Feb 03, 2014 7:35 pm
so in the mean time, i'm going to refurb the standard one.
I dismantled it all and measured all of whats left of the nylon bushes, and have order phosphor bronze bushes to replace them.
there was play in three seperate areas in the mechanism (along with the slack at the cable mount at the box) so i'm amazed I could get it in any gear!!
I'll update when the new bushes arrive, and hopefully I'll be able to put the bloody van back together again!
In other news, I changed the diesel filter, which seemed to be half full of gammy black oil (which may explain a few things)
After a few goes at trying to bleed the system by cranking the engine over, I had to retire back inside to the manual to figure out how to do it. I found that you have to prime the fuel pump manually whilst bleeding, so I'll have a go at that when I get chance.
I also looked into the oil leak, which on further inspection seems to be coming from the fuel pump. Another look at the manual suggests this is a split diaphragm. So ive order a second hand pump to swap over. I'm hoping that will cure the smoking and drop off of power at certain RPMs, it certainly tally's up that this may be the cause.
Ive also got a new oil filter and oil to go in, but want to sort the fuel pump first.
I've fitted the snorkel, using all manor of random air intake pipes acquired at the scrappy, looks a bit ratty, but it'll do for now.
I've got a high level brake light to go on (once rear-ended, forever paranoid!)
got some decent cable to replace some of the hacked up cable to the rear lights
been diliberating over what to do about wheels/tyres, as the tyres on at the moment are on the limit, but I dont want to buy tyres for these if I then end end getting different wheels and the tyres not fitting.
I've found the exhaust leak is actually further up than I thought and is the gasket between manifold and downpipe, so should be an easy fix
handbrake cables are ordered
the company i'm discussing the coilovers with seem quite keen in doing them so I just need to get them a shock to use for measurements
all in all, its turning into a bit more of a major project than I first intended, could really do with getting it all back together, so I can use it for work and give my car the much needed attention it needs!
johnnyboy666- Centurion
- Posts : 163
Join date : 2013-10-16
Location : Derbyshire
Re: bit of a project thread
![]() by 8bit-ash Tue Feb 04, 2014 6:40 pm
by 8bit-ash Tue Feb 04, 2014 6:40 pm

8bit-ash- Centurion
- Posts : 424
Join date : 2010-05-12
Re: bit of a project thread
![]() by johnnyboy666 Tue Feb 04, 2014 6:57 pm
by johnnyboy666 Tue Feb 04, 2014 6:57 pm
It also depends on how many people would be interested
Where abouts are you located?
johnnyboy666- Centurion
- Posts : 163
Join date : 2013-10-16
Location : Derbyshire
8bit-ash- Centurion
- Posts : 424
Join date : 2010-05-12
Re: bit of a project thread
![]() by johnnyboy666 Tue Feb 04, 2014 8:32 pm
by johnnyboy666 Tue Feb 04, 2014 8:32 pm
johnnyboy666- Centurion
- Posts : 163
Join date : 2013-10-16
Location : Derbyshire
Re: bit of a project thread
![]() by 8bit-ash Tue Feb 04, 2014 9:21 pm
by 8bit-ash Tue Feb 04, 2014 9:21 pm
8bit-ash- Centurion
- Posts : 424
Join date : 2010-05-12
Re: bit of a project thread
![]() by johnnyboy666 Wed Feb 05, 2014 11:39 am
by johnnyboy666 Wed Feb 05, 2014 11:39 am
johnnyboy666- Centurion
- Posts : 163
Join date : 2013-10-16
Location : Derbyshire
Re: bit of a project thread
![]() by 8bit-ash Wed Feb 05, 2014 5:38 pm
by 8bit-ash Wed Feb 05, 2014 5:38 pm
8bit-ash- Centurion
- Posts : 424
Join date : 2010-05-12
Re: bit of a project thread
![]() by johnnyboy666 Wed Feb 05, 2014 6:28 pm
by johnnyboy666 Wed Feb 05, 2014 6:28 pm
johnnyboy666- Centurion
- Posts : 163
Join date : 2013-10-16
Location : Derbyshire
Re: bit of a project thread
![]() by johnnyboy666 Wed Feb 19, 2014 12:33 pm
by johnnyboy666 Wed Feb 19, 2014 12:33 pm
Bought some 13" steelies off ebay (the mazda 323? Ones that were in the wheels topic) for £50. Not bad considering theyve never even had tyres on.
Centre bore is a bit too small, so will need to get the hubs machined on the front.
This means I'll be able to drop the tyre size to 175/50/13 up front, to assist with getting the front as low as the back when ive had a mess around with the leafs
Luckily I also went and collected a pair of complete front struts with top mounts, springs, brakes and hubs for £50, so I'll pinch the spares off those and then send a strut off to be used as a template for the coilovers!!
I've also got a pair of tyres to use on the rear with the 12" Wheels after ive had them banded. Think agricultural ratrod vs off road for an rough idea.
johnnyboy666- Centurion
- Posts : 163
Join date : 2013-10-16
Location : Derbyshire
Re: bit of a project thread
![]() by johnnyboy666 Mon Mar 10, 2014 10:12 pm
by johnnyboy666 Mon Mar 10, 2014 10:12 pm
First thing was to finish fitting the drivers handbrake cable, which went relatively well, except I took the little spring off the shoe to make it easier to get the cable in, and it shot about forty foot down the street when I tried to get it back in. Retrieved it, refitted, sorted.
Sorted out the passenger brake, which I hadn't done right (see other thread)
With that done, I decided to remove the bracket that the 3 handbrake cables slot into, from the bed of the pickup and mount it on the frame, so the bed can be removed and still leave the pickup useable.
Drilled through the 3 spot welds and twatted a screwdriver between them and off it popped.
used one of the holes I drilled to mount it on top of the gearbox mount for the time being, seems like a good place for it. Forgot to take any photos of that.
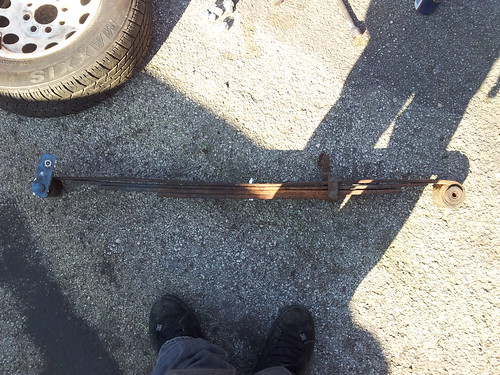
Then I had some fun with leaf springs!!
I've done plenty of reading up on various leaf spring lowering methods, includind the de-cambering with a bottle jack method, the removing a leaf method, reversing the eyes etc etc
I decided, the best option for me (to get quite a decent drop) was to decamber, reverse the eyes, but keep all the leaves, to retain plenty of stiffness.
The very simple way I found to do this, is the old hotroders technique of flipping a leaf, in this case the top leaf, which not only reversed the eyes, but when clamped back together, decambers the pack
Tada:
simple to do:
-take leaf pack off
-clamp pack, and remove retaining bolt (with angle grinder most likely)
- gently release leaves
-flip top leaf, use long bit of M8 studding to poke through the holes, slowly tighten.
-when tight, tap all leaves into line and then clamp with bench vice.
-remove studding, and replace with new m8 bolt (check the head fits in the locating hole on axle first)
- do other side and refit
as a precaution, I ground down a few protruding bits of metal in the front leaf mounts, just in case the was any chance of contact
Now obviously I'm not going to get very far running on the bumpstops, so out with the grinder....
detatchable-tastic.
And a clue to this pickups previous life perhaps??-
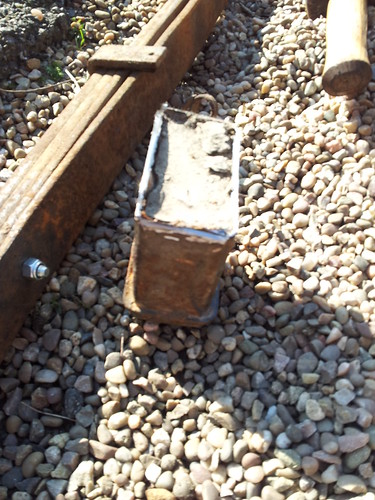
this bumpstop was full to the brim with what looked like cement or clay or some sort of grey powder stuff, perhaps this vehicle worked in a quarry or something??
Quick spray of paint over the freshly cut metal, then back on with the wheel -
and in this photo, you can see the difference in ride height between the dropped side and side not yet done-
and a funny pic of it cocking its leg with one leaf taken off :p
both side done
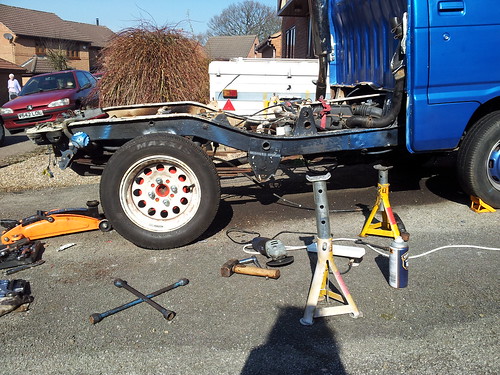
And in that pic, you'll see the other bit of stuff ive been working on, the exhaust!
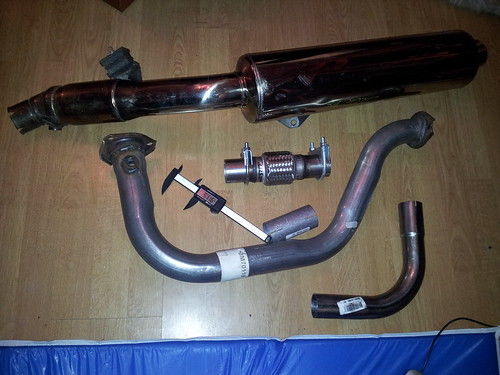
A few parts to start off with^^
I got off to a really bad start when it came to the exhaust, took the centre section/backbox off no problem. and got the heatsheild off the manifold/downpipe (which I'd had off before)
realised where the massive exhaust leak was coming from, the gasket between mani and downpipe was completely shot (have a new one as I suspected this was the issue)
Then the major cock up. took the downpipe off, as I needed to get the grinder on it to cut the flange off whish mates to the centre section, so I could use a sleeved exhaust bend to get the exhaust pointing the right way.
cut it off, then swiftly realised I had the pipe the wrong way round, and cut of the wrong end!!! F******
so had to spend another £20 on a second hand one on ebay which I'm waiting to arrive.
the back box (which has a built in cat, not that I need it) is off a honda cbr600fx ( I warned you lot, some of my bike project parts would wind up on here, along with the wheels off the pug that are on there currently!)
I couldn't believe how bloody cheap these things are! LESS than £30 DELIVERED , barely used, full stainless, will last longer than the van, cant complain!!
as for mounting it, I bought a ladder rack off ebay, ( looks like a bit of a roll bar) which will be used at a later date to make a cover for the back of the pickup, but the brackets for this have a convenient extra threaded bolt hole, which was perfect to mount the box to.
A peugeot wheel bolt, not only fits perfectly to block the Lambda sensor hole which I wont need, but it ideal for mounting another bracket to, said bracket happens to be a part of the shock linkage from a cbr1000rr (are we sensing a frugal theme here)

after messing about with the exhaust bends for a while, I decided to wait till the new downpipe arrives so I have a solid point to start from.
the pipe will go under the chassis, next to the battery and with have a small flex pipe to deal with engine rocking.
dowpipe and centre pipe will then all be wrapped with heat proof material, to keep under seat temps down and to protect anything near to the pipes. The back box I will monitor to see what the temperatures get to, and might make a heat shield if necessary.
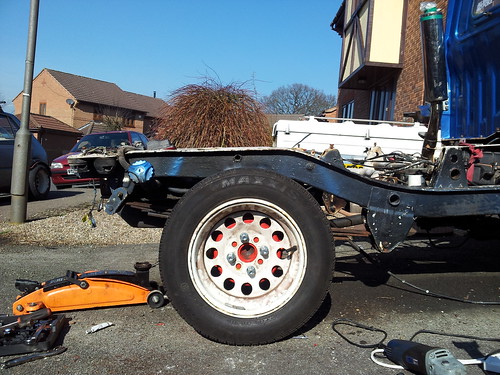
Other things to report, had some brand new part worn tyres slapped on the front wheels.
and dismantled one of the struts I bought to get sent off for the coilover project
It disturbs me how you can take the top mount off these struts and not knock your front teeth out, there is literally no preload on these springs
anyway, that'll do for now. I'd love to say I went for a test drive with the lowered rear end, but the cock up with the exhaust flange put a stop to that
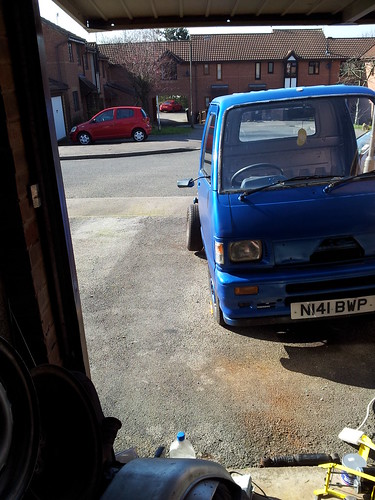
next job, to sort this bag of smeg out:
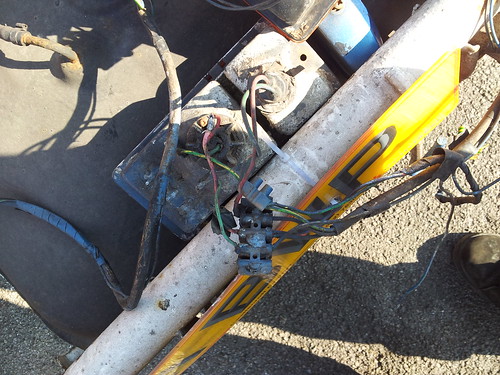

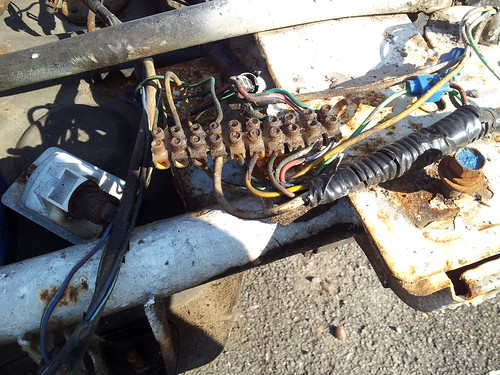
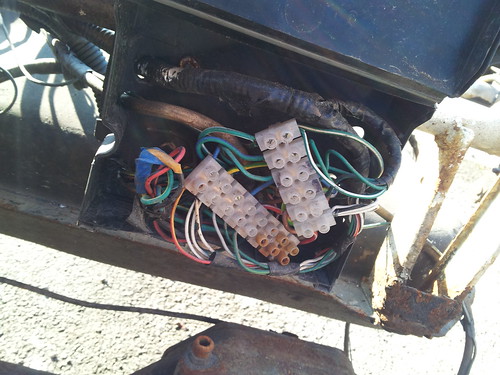
wish me luck. got a pair of new trailer lights to replace that mess for the time being, which were conveniently the same size as the standard lights
I'll shut up now, my fingers are tired
johnnyboy666- Centurion
- Posts : 163
Join date : 2013-10-16
Location : Derbyshire
Re: bit of a project thread
![]() by HighlyJetted Tue Mar 11, 2014 1:47 am
by HighlyJetted Tue Mar 11, 2014 1:47 am
Loving the spring modifications.
Typical bodged wiring though! Soldering it is a right pain as the copper is always really oxidized.
You'd better like the sound of that exhaust as there will be no getting away from it
I've welding my handbrake splitter to a similar place too.
Looking at this makes me want to get more work done on my hijet pickup project.

HighlyJetted- Hijet Overdose
- Posts : 5595
Join date : 2009-10-06
Age : 41
Location : Cheshire -

Guest- Guest
Re: bit of a project thread
![]() by johnnyboy666 Tue Mar 11, 2014 1:36 pm
by johnnyboy666 Tue Mar 11, 2014 1:36 pm
Yeah I like posts with lots of photos, a picture says a thousand words.
The standard exhaust had soo many holes in it, and along with the blowing at the mani, I'm actually expecting this to be slightly quieter than before! (Wishful thinking maybe)
I'm more concerned about quitening down the clackety-clack of this boat engine which will probably involve a couple of layers of sound deadening under the seats on top of the 'bonnets'
I might end up taking the wiring all the way back to the cab for peace of mind
johnnyboy666- Centurion
- Posts : 163
Join date : 2013-10-16
Location : Derbyshire
Re: bit of a project thread
![]() by ToaseMan Tue Mar 11, 2014 7:46 pm
by ToaseMan Tue Mar 11, 2014 7:46 pm
Make sure the seats are cliped down for one. I found that when having a diesel hijet. As the seat moves back everything seams to get louder (Mind this was a van, i don't know how pickups seats work)johnnyboy666 wrote:
I'm more concerned about quitening down the clackety-clack of this boat engine which will probably involve a couple of layers of sound deadening under the seats on top of the 'bonnets'
Though i think they sounds quite nice on tick over...Just once they rev...

ToaseMan- Chatterbox
- Posts : 77
Join date : 2014-01-25
Location : Middle of no-where
Re: bit of a project thread
![]() by FrontBackSide2Side Wed Mar 12, 2014 8:19 am
by FrontBackSide2Side Wed Mar 12, 2014 8:19 am
FrontBackSide2Side- Cinquecento
- Posts : 584
Join date : 2013-10-04
Age : 41
Location : Kidderminster
Page 1 of 3 • 1, 2, 3 ![]()
|
|
|