Skylark Spoiler
2 posters
Page 1 of 1
 Skylark Spoiler
Eventually braved the cold in the garage to make a start on the rear spoiler for Skylark. Its based on one done previously by HJ but I am going to retain the central high stop light. The original spoiler is a Suzuki Ignis one that is you are lucky you can drop on them quite cheap on fleabay which is where mine came from. They are a nice match except they are too wide so a bit of chop chop (as the Mighty Car Mod guys say on Youtube) is required.
The spoiler when cut will match the existing ridges on the roof.

Spoiler fit for a Suzuki Ignis

Dimensions if anyone else fancies a go, measure twice cut once.

Spoiler now fit for a hijet
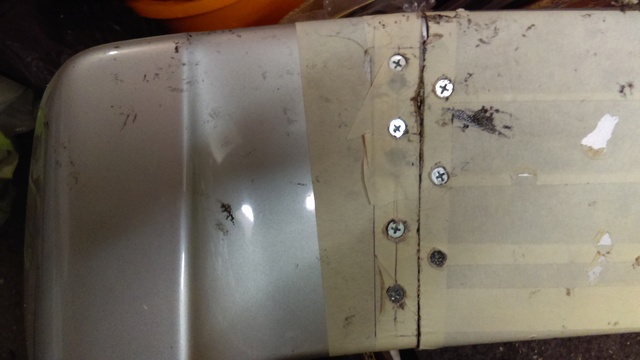
Tried it up to the van and a perfect match but I think a bit of strengthening at the joint lines is required as the masking tape seems to be a bit 'fragile' for a permanent solution
Updates as soon as I brave the cold weather again!
The spoiler when cut will match the existing ridges on the roof.

Spoiler fit for a Suzuki Ignis

Dimensions if anyone else fancies a go, measure twice cut once.

Spoiler now fit for a hijet
Tried it up to the van and a perfect match but I think a bit of strengthening at the joint lines is required as the masking tape seems to be a bit 'fragile' for a permanent solution
Updates as soon as I brave the cold weather again!

Raggy- Jet Addict
- Posts : 1630
Join date : 2015-05-25
Age : 61
Location : Doncaster
 Re: Skylark Spoiler
A little bit done in the garage and now I have thawed out I'll post the pics. Started to fix the shortened spoiler back together a bit more permanently. Used some plastic strips as bridging pieces across the join inside the spoiler. Glued them with polyurethane adhesive then screwed them through. When both ends are done I'll plastic weld the joints together as well. So far so good and well pleased with how they have aligned. Remembered to put some tube through for the cable for the lights...could have been a disaster if I had forgotten that as no spare room inside with plastic strips in to get a cable through afterwards!


Raggy- Jet Addict
- Posts : 1630
Join date : 2015-05-25
Age : 61
Location : Doncaster
 Re: Skylark Spoiler

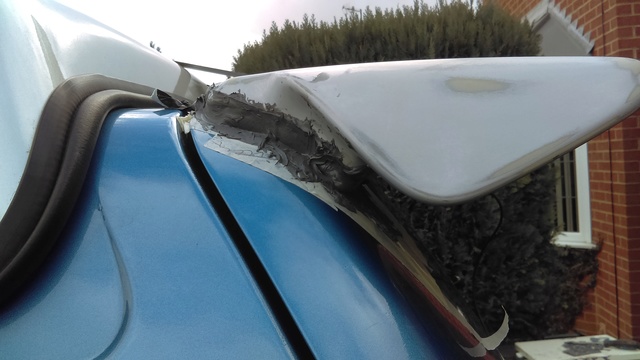
In the wrong order the pics but this is the modified fitting to change the profile of the spoiler to match to hije5 rear door. Filler used for the outside and the middle to be filled with fibre glass and matting mix.

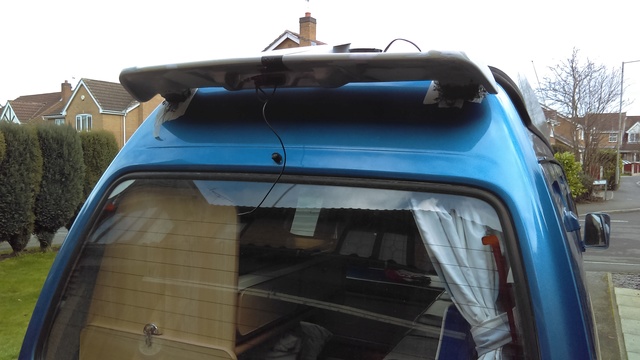
First fitting of the modified spoiler, not bad at all. Needed to do this to get the fitting correct and to set up the reversing camera that I have fitted to the spoiler. No guessing now how close I will be to something now.


The spoiler supports being moulded to fit the rear door profile to make it a better fit.
Next job to finish off the support mouldings, rub it down, prime it, sort out how to get wires to it and how to get access to the fixing bolts would help! Current feeling is to finish it in silver like the pop up roof but could also be blue to match the rear door....decisions...preferences anyone?

Raggy- Jet Addict
- Posts : 1630
Join date : 2015-05-25
Age : 61
Location : Doncaster
 Re: Skylark Spoiler
Know this has been quiet for a while but the update is I nearly got to the point of spraying it....then I dropped it on its end and it cracked the filler so had to refill that...oops! Hung it up to spray, turned my back and the hook I put it on gave way Grrrrrr. Any way I'll post an update soon when I get back on it. Should have plastic welded the joints where I shortened it and I bet it would not have cracked then but though the joint as I had done them were OK, which they are for normal use just not dropping it on its end! Oh well, live and learn.

Raggy- Jet Addict
- Posts : 1630
Join date : 2015-05-25
Age : 61
Location : Doncaster
 Re: Skylark Spoiler
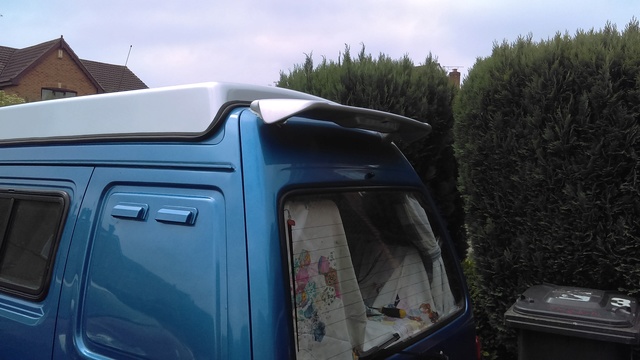
Well its been a while to get to this point. Finally got the spoiler painted and ready to fit. It’s a case of measure twice if not three times then drill the holes for the mounting bolts! Not something you want to get wrong. Went on quite well in the end, so I now have a spoiler with built in high level brake light and a rear view camera pointing down so I can see how close I am to things at the back, Quire happy how it’s turned out. Used two bolts ether side to fix it on as well as Tiger Seal Polyurethane adhesive so it should not come loose any time soon. Just got to wire up the camera to the screen (a combined rear view mirror, LCD screen a and front view camera/recorder). Tested it and it works so maybe next weekend will see that finished.
Second pic looks messy around the mounts as I had not taken off the patterns I used to mark out the bolt holes at that point.


Second pic looks messy around the mounts as I had not taken off the patterns I used to mark out the bolt holes at that point.


Raggy- Jet Addict
- Posts : 1630
Join date : 2015-05-25
Age : 61
Location : Doncaster
 Re: Skylark Spoiler
Not that it's really a fair test with your pop top there too, but does the back window stay cleaner now you have the spoiler fitted?
gogopiaggio- Centurion
- Posts : 172
Join date : 2018-09-07
Age : 39
Location : seaside
 Re: Skylark Spoiler
Can’t say it keep the screen clearer, but I have found a flaw in my design....if it’s wet over night, water collects on the camera lens!...ooops Something I didn’t cater for. Just needed the edges of the camera to be lower, something for later. Also found at night I need better reversing lights as it’s higer up, the LEDs on the camera are not bright enough. Need to add better lights, may redesign the bumper to integrate larger better ones. Overall happy with the spoiler though.

Raggy- Jet Addict
- Posts : 1630
Join date : 2015-05-25
Age : 61
Location : Doncaster
 Similar topics
» Hi-Jet with Grey Plastic Body Kit.
» Skylark and the cat...
» Up with the Skylark
» Skylark goes to the IOW (again!)
» Rear spoiler
» Skylark and the cat...
» Up with the Skylark
» Skylark goes to the IOW (again!)
» Rear spoiler
Page 1 of 1
Permissions in this forum:
You cannot reply to topics in this forum