
reasons why my hijet was over heating, 1... 2... 3... 4... and more!
Page 1 of 3 • 1, 2, 3 ![]()

reasons why my hijet was over heating, 1... 2... 3... 4... and more!
![]() by elfin girl Tue Oct 30, 2012 11:09 pm
by elfin girl Tue Oct 30, 2012 11:09 pm
it all started with a lack of heat in the cab last winter, took it be fixed, told there was no thermostat, it then worked ok till the new year when it started overheating... so water pump checked, thermostat checked and replaced, then removed totaly, still over heating
its now i start paying a bit more interest in whats going on rather than leaving it a mechanic
firstly i noticed when it was overheating the bottom pipe from rad (as your looking from the front the left side) was cool while the top pipe was scorching hot, the bottom left of rad was also cooler than the rest, so removed rad, put in the bath and then soaked mr muscle pipe and drain cleaner in it for 1hr, rinsed out, i did get a few bits of crud out but wasnt convinced so making sure it was flushed out i then poured in harpic limescale remover, this worked a treat as you can see from the picture,

i did this 3 times before i got bored, it was still fizzing but not as much, a lot of bits did flush out, including something that im not sure how important it was, and i did have concerns that i may have compromised any gaskets at the bottom join of the rad

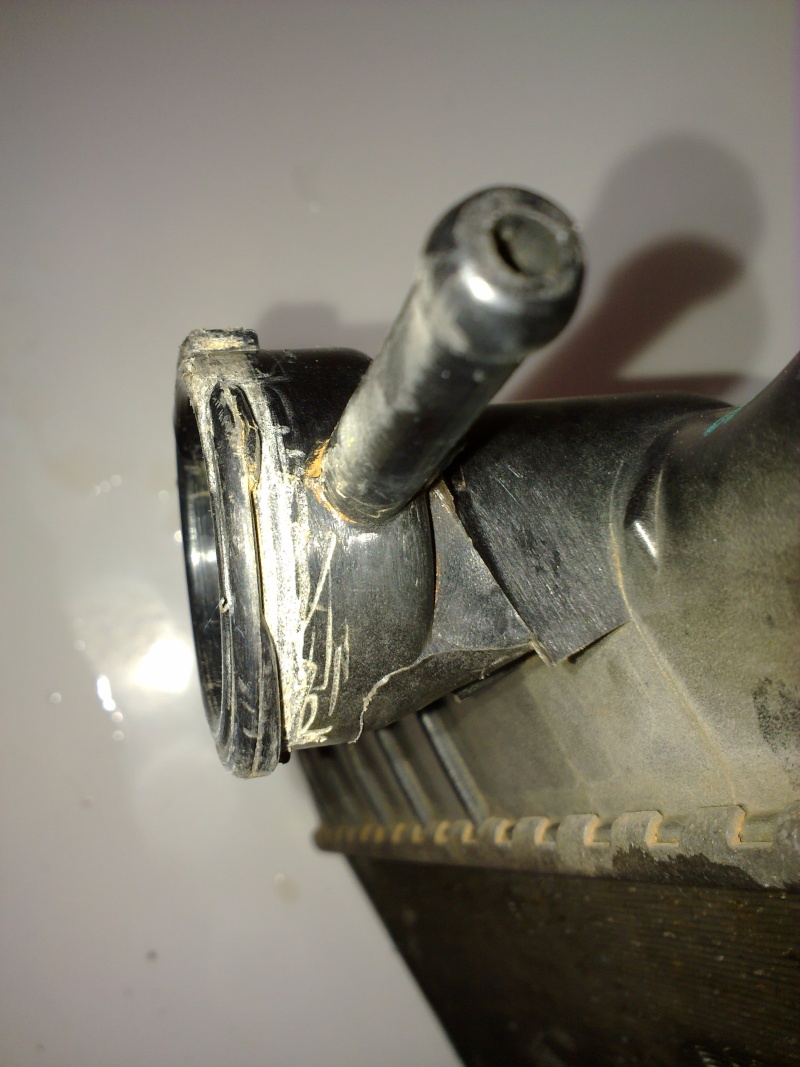
put the rad back on and primed the system, rad and pipes now all getting to even temp, situation improved but still over heating so back on the ramp to check all the pipes, found two small pipes that were not getting hot at all, one going from just above the drain plug to the expansin pipe and one comming from the back of the engine at the inlet manifold to the throttle body, the first was full of damp gunge the second was bone dry, i used a compresser to blast through and get the water fowing again.

again an improvement, but STILL overheating, during this time i did 4 block tests and had compresion tests done (thanks rich), none indicating head gasket
running from cold at tickover all appeared fine, it would get to temp, fan would kick in, it would sit like this for however long you wanted it to, i could drive at full speed (warp 9 ill have you know!) and have no problems (most times), however if i let it tick over and get to temp before driving or if i did several seperate journeys, it would over heat, purging all the water into the expansion tank, sometimes it would suck the water back on cool down, other times it wouldnt,
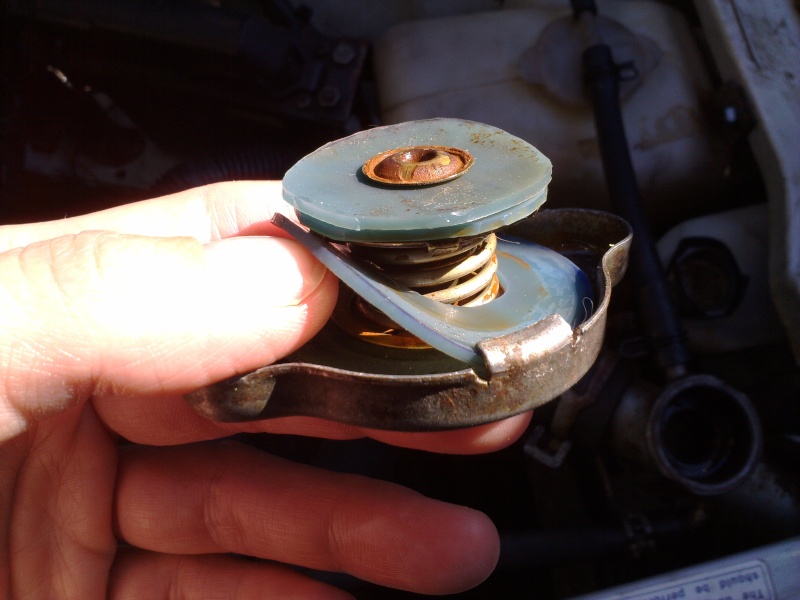
the pressure caps seemed to be a real issue at this point, it started leaking from the rad cap, i found that the plastic flange had been gauged and worn from over use so had to add some extra seals on the cap to remedy this
this is an old cap but you get the idea of the extra seals i put on (cut out from a silicone cake case)
on the expansin pipe i used one from blue print, so far the best fit ive found

i also did a presure test on the system dry and sprayed pipes with washingup liquid soloution to check for leaks then went through the pipes and replaced/resealed and put new clips on where needed

now with the newly sealed pipes it bacame more apparent there was too much presure in the cooling system, the pipe were getting realy quite firm pretty soon after start up, and now i had better caps on it was clearers that there were definate bubbles being purged into the expansion tank after most journeys, this was happening AFTER the ignition was being switched off but causing and air gap in the top of the pipe (which got bigger every time the ingnition was switched off) and preventing the system from being able to suck back any water it had purged into the expansion tank
heres a few of the bubbles im talking about here, sometimes just a few, othertimes it had real bad flattulance!

and did i mention the froth in the expansion pipe? only noticable if i started the engine withought the cap on or started it up then stoped and checked under the cap (because otherwise it was too hot to take off and all the water would just spurt out!)

so, now im thinking, it must be the head gasket, maybe i was stupid and had it running on gas when i did the block tests?
did another block test, this time buy removing some of the water from the expansion pipe so it doesnt get sucked into the tester, using an extension tube too, and clamping the pipe going into the expansion tank, tested while engine running.. nothing... liquid remains a lovely rich blue, but i decided to keep testing AFTER switching off the ignition, and hey presto, the liquid started turning green
so at last it was confirmed the head gasket has gone (whether it had at the beginning who knows!)
so back to the vehichle hospital my van goes and i attempt to remove the head
its now late and ive got to go to bed, i will upload my pics of the head and gasket tommorow

elfin girl- Cinquecento
- Posts : 919
Join date : 2012-09-12
Age : 51
Location : hoddesdon
Re: reasons why my hijet was over heating, 1... 2... 3... 4... and more!
![]() by HighlyJetted Tue Oct 30, 2012 11:15 pm
by HighlyJetted Tue Oct 30, 2012 11:15 pm
p.s. good luck bleeding it up

HighlyJetted- Hijet Overdose
- Posts : 5595
Join date : 2009-10-06
Age : 41
Location : Cheshire -

Re: reasons why my hijet was over heating, 1... 2... 3... 4... and more!
![]() by elfin girl Thu Nov 01, 2012 7:29 pm
by elfin girl Thu Nov 01, 2012 7:29 pm
next job, the head gasket

i did initialy wuss out at the thought of doing this and left the van at my local garage, after 4 days he still hadnt looked at it so i took the van back and decided id borrow garage space at my exs to try and do the job myself (knowing there was always help at hand!)
sooo, first remover the seats, then the panel behing the seats, and the one with the hand brake (not forgetting to put a plank of wood behind the wheels to stop it rolling away)
then unbolting manifold, removing timming belt and rocker cover then unbolting exhaughst to give a bit more room, rocker cover and head can then be "wiggled" through the gap from underneath the van.
after removing rocker cover i get a nice fresh but used smell of oil, as the head bolts were undone came the release of a putrid burnt smell of oil, the bolt neares pot 4 looks pretty gunged up, im thinking this is all caused by dodgy gasket soaked in burn oil
so heres what the head looked like

and the pistons

as you can see pot 4 is looking a little washed, and this is why.......the top of the gasket....

and the bottom of the head gasket.......

close up of gasket at pot 4, top then bottom, as you can see... its shagged... new one on the way!!


i am just waiting for the new gasket set to arrive, if im lucky it will be here tommorow
and i will be washing the gunge out of the water jacked before you ask
oh and interestigly when the compression test was done pot 4 actually had slightly higher compression... go figure....
elfin girl- Cinquecento
- Posts : 919
Join date : 2012-09-12
Age : 51
Location : hoddesdon
Re: reasons why my hijet was over heating, 1... 2... 3... 4... and more!
![]() by HighlyJetted Thu Nov 01, 2012 9:31 pm
by HighlyJetted Thu Nov 01, 2012 9:31 pm
p.s. I am working on a couple of draft article to put on the daihatsuhijet.co.uk website regarding overheating. Can I reuse some of these head gasket pictures?
HighlyJetted- Hijet Overdose
- Posts : 5595
Join date : 2009-10-06
Age : 41
Location : Cheshire -
Re: reasons why my hijet was over heating, 1... 2... 3... 4... and more!
![]() by elfin girl Thu Nov 01, 2012 9:57 pm
by elfin girl Thu Nov 01, 2012 9:57 pm
head has been skimmed and is ready waiting to be put back on,
and yes your more than welcome to use the pics
elfin girl- Cinquecento
- Posts : 919
Join date : 2012-09-12
Age : 51
Location : hoddesdon
Re: reasons why my hijet was over heating, 1... 2... 3... 4... and more!
![]() by stevelav Thu Nov 01, 2012 10:04 pm
by stevelav Thu Nov 01, 2012 10:04 pm
Do you think it comes from your hijet overheating that your gasket blew or is it the other way round?
And do you think your pipes and radiator gunging up come from using hard water that leaves limescale in your pipes?
Please take some pictures when you do the timing belt and say what the tricky bits are as i'm a bit apprehensive. Especially about removing the camshaft and crankshaft pulleys.
It says in the manual you need 020172y specific tool to lock the timing belt pulley
and 020184y flywheel locking tool and 020397y flywheel lock wrench.

stevelav- Centurion
- Posts : 137
Join date : 2011-09-17
Re: reasons why my hijet was over heating, 1... 2... 3... 4... and more!
![]() by elfin girl Thu Nov 01, 2012 10:19 pm
by elfin girl Thu Nov 01, 2012 10:19 pm
the rad seemed to have lime scale in it and rad weld stuff, the pipe at the front was clogged with rad seal stuff and the pipe at the back was bone dry, grit flew out when I blasted the air gun through fron the pipe in the engine but didn't see what it was
I must admit in the 3 years since I bought I hadn't done anything to it, maybe I should have kept the cooling system a bit cleaner, a lesson learned!
I think it had been in need of attention for some time, seemed to put up with quite a lot before the problem was noticeable, judging by the state of the gasket I think that had been going for a while it doesn't look like its just gone, so all in all the fact that it still started and drove in that state think it was doing pretty well, it didn't seem to want give up easily!
so hopefully it will all work fine when it's put back together, I did get help actually removing the head as it involved laying underneath to wiggle it out and I was a bit worried I'd drop it on my head!
I don't know anything yet about which tools I need but will borrow what I need and take pics going along,
My eyes are are a bit googly now and having trouble finding the figures for the correct torque on the head bolts, any idea HJ ?
I'm guessing the marks I put on the head side for position of belt pulley may well have come off at the engineers too!
elfin girl- Cinquecento
- Posts : 919
Join date : 2012-09-12
Age : 51
Location : hoddesdon
Re: reasons why my hijet was over heating, 1... 2... 3... 4... and more!
![]() by HighlyJetted Fri Nov 02, 2012 2:26 am
by HighlyJetted Fri Nov 02, 2012 2:26 am
The cam pulley on the other hand often fights against the valve springs a little, so a 12mm spanner on the nut and a handy assistant to keep it still might help a newbie fumble with the belt.
Make sure you do it with the plugs out too so its easy to spin the crank without fighting against any compression.
Timing Marks
Now take a close look at that toothed bottom crank pulley the cam belt sits on... on one of the ends of the teeth there is a little dimple drilled into it. On the casting of the block there is a little notch/finger - line them pair up together.
On the cam pulley there is an F - this denotes the top, make sure its at the top. On the pulley there are a couple of marks, one on each side (e.g. 3 o'clock and 9 o'clock) These line up with little marks on the cylinder head.
Always use the manufacturers line up marks, making your own new ones is good practice to get an idea, but you never know if the belt was on wrong in the first place. About 10% of the cam belts I have changed have been a tooth out on one of the pulleys, especially twin cam engines.

One manual says - Cylinder head to Cylinder block blots - 59 / 67 torque in Nm
Another says Tightening torque - 58.8Nm to 66.7nm
Make sure you do the old even pressure order tightening sequence as stated in the manual:-
7 - 5 - 2 - 4 - 10
9 - 3 - 1 - 6 - 8
I'd pull them all down gently as always best practice, first nip them all up evenly, then take them evenly to 50 Nm, then to 60Nm, then to the final 67Nm. Always slightly oil the threads, and make sure there is no water etc down the threaded holes in the block. When I say slight oil, i mean a splash then wipe it evenly with a cloth, so you can't see any oil. It reduces the friction so yo get a better torque reading of tension, not friction from the thread.
p.s. Well impressed with your efforts Daisy, and the photos n write ups
HighlyJetted- Hijet Overdose
- Posts : 5595
Join date : 2009-10-06
Age : 41
Location : Cheshire -
Re: reasons why my hijet was over heating, 1... 2... 3... 4... and more!
![]() by elfin girl Fri Nov 02, 2012 10:05 am
by elfin girl Fri Nov 02, 2012 10:05 am
Still waiting for the gasket set, I'm itching to get ths done, hurry up mr postman
elfin girl- Cinquecento
- Posts : 919
Join date : 2012-09-12
Age : 51
Location : hoddesdon
Re: reasons why my hijet was over heating, 1... 2... 3... 4... and more!
![]() by Logi Fri Nov 02, 2012 11:22 am
by Logi Fri Nov 02, 2012 11:22 am

Logi- Jet Warrior
- Posts : 3662
Join date : 2011-04-07
Age : 88
Location : Kilmarnock
Re: reasons why my hijet was over heating, 1... 2... 3... 4... and more!
![]() by HighlyJetted Fri Nov 02, 2012 11:30 am
by HighlyJetted Fri Nov 02, 2012 11:30 am

HighlyJetted- Hijet Overdose
- Posts : 5595
Join date : 2009-10-06
Age : 41
Location : Cheshire -
Re: reasons why my hijet was over heating, 1... 2... 3... 4... and more!
![]() by stevelav Fri Nov 02, 2012 11:57 am
by stevelav Fri Nov 02, 2012 11:57 am
So the crank pulley is easy enough to get off with 4 bolts and i guess if its in gear then the crank shaft is held in place.
The manual mentions the 'special spanner' to remove the cam shaft pulley and also another tool to hold the cam shaft in place. Did you remove yours with a normal spanner and what holds the cam shaft in place to stop it rotating?
Also great info about lining up the marks but how do you make sure you put the new pulleys on in the exact same position so that the marks are still valid?
stevelav- Centurion
- Posts : 137
Join date : 2011-09-17
Re: reasons why my hijet was over heating, 1... 2... 3... 4... and more!
![]() by HighlyJetted Fri Nov 02, 2012 12:05 pm
by HighlyJetted Fri Nov 02, 2012 12:05 pm
You don't have to take the cam pulleys off.
HighlyJetted- Hijet Overdose
- Posts : 5595
Join date : 2009-10-06
Age : 41
Location : Cheshire -
Re: reasons why my hijet was over heating, 1... 2... 3... 4... and more!
![]() by stevelav Fri Nov 02, 2012 12:16 pm
by stevelav Fri Nov 02, 2012 12:16 pm
You have pretty much sorted out the bits I was worried about that aren't clear in the manual.
It'll prob be a few weeks before I do it as I have a broken exhaust, oil change, faulty fuel gauge, window seal, smashed rear light, brake cable problem and MOT to do first.
But maybe Daisy will do hers first and illustrate with pictures?
stevelav- Centurion
- Posts : 137
Join date : 2011-09-17
Re: reasons why my hijet was over heating, 1... 2... 3... 4... and more!
![]() by Logi Fri Nov 02, 2012 12:26 pm
by Logi Fri Nov 02, 2012 12:26 pm
HighlyJetted wrote:Seems the hijet manual tells you to oil them then quotes the figure?
Fairy nuff
Most Jap bikes are dry figures, good to know ( though hg on mine and its scrappy time)
Logi- Jet Warrior
- Posts : 3662
Join date : 2011-04-07
Age : 88
Location : Kilmarnock
Re: reasons why my hijet was over heating, 1... 2... 3... 4... and more!
![]() by elfin girl Fri Nov 02, 2012 1:56 pm
by elfin girl Fri Nov 02, 2012 1:56 pm
Visiting my sis in hospital tommorow so cant do it till Monday, this better fix it once and for all time !
elfin girl- Cinquecento
- Posts : 919
Join date : 2012-09-12
Age : 51
Location : hoddesdon
Re: reasons why my hijet was over heating, 1... 2... 3... 4... and more!
![]() by El_Ventu Fri Nov 02, 2012 3:35 pm
by El_Ventu Fri Nov 02, 2012 3:35 pm
I don't know exactly what kind of chemicals your contains, but in my experience all that products are aluminum killers!
They breaks off the aluminum oxide coat that protects all the aluminum parts and convert it into a non-protective coat.
Then aluminum starts to oxidize deeply.
In italy we call this process "cancro dell'alluminio", aluminum cancer.
I hope your radiator and engine was flushed properly after the treatment...
El_Ventu- Centurion
- Posts : 221
Join date : 2012-10-07
Re: reasons why my hijet was over heating, 1... 2... 3... 4... and more!
![]() by elfin girl Fri Nov 02, 2012 4:05 pm
by elfin girl Fri Nov 02, 2012 4:05 pm
elfin girl- Cinquecento
- Posts : 919
Join date : 2012-09-12
Age : 51
Location : hoddesdon
Re: reasons why my hijet was over heating, 1... 2... 3... 4... and more!
![]() by El_Ventu Sat Nov 03, 2012 1:07 pm
by El_Ventu Sat Nov 03, 2012 1:07 pm
click
El_Ventu- Centurion
- Posts : 221
Join date : 2012-10-07
Re: reasons why my hijet was over heating, 1... 2... 3... 4... and more!
![]() by stevelav Sat Nov 03, 2012 1:51 pm
by stevelav Sat Nov 03, 2012 1:51 pm
stevelav- Centurion
- Posts : 137
Join date : 2011-09-17
Re: reasons why my hijet was over heating, 1... 2... 3... 4... and more!
![]() by El_Ventu Sat Nov 03, 2012 5:22 pm
by El_Ventu Sat Nov 03, 2012 5:22 pm
"313,020
RADIATOR CLEANER
DESCRIPTION
GREEN STAR RADIATOR CLEANER is a professional product formulated for cleaning the cooling system of vehicles and stationary engines.
PROPERTY
- Dissolves lime deposits and rust, loosens the oil deposits and sludge.
- Keeps impurities in suspension.
- Does not affect any part of the circuit with which it comes into contact.
- Restores a great heat exchange in the cooling system.
- Restore the proper functioning of valves and thermostats.
- It is compatible with all types of glycol based coolants.
APPLICATIONS
- Suitable for all water cooling systems of vehicles and stationary engines.
- To be used when a too high temperature of the liquid is due to a loss of efficiency of the system due to impurities or deposits.
- Possible use in case of oil deposits in the cooling circuit.
- The treatment of cleaning of the circuit is to be carried out before the replacement of the cooling liquid.
HOW TO USE
- With heater in "open" position, empty the circuit.
- Shake well and pour into the cooling system (not in the expansion tank, if there is a forced circulation).
- Fill with water.
- Run the engine for at least 20/30 minutes or use the car for max. 200 km.
- Allow engine to cool and drain.
- Flush the system with water as long as this does not run clear and filled with a special liquid.
- Check that there are no losses caused by the elimination of limescale.
- If necessary, add GREEN MICRO-STAR RADIATOR SEALER.
- The dose of 325 ml treats circuits from 5 to 10 liters."
I used it after a flush with water.
Flushing with water after five minutes water comes out pretty clean, then I stop flushing, no results on my overheating problem (but I run a pre-chambered turbo diesel engine @1.9bar of boost with fullly opened flow injection pump
Then I tried with this product.
Flush with water after the treatment, loads of sludge comes off from the engine...
However no results on overheating issue.
But at that point I was sure that radiator and cooling system were clean.
You can obviously find some other good products instead of the italian green star.
Some users of "vintage" autocaravans that I know on other forums uses a solution of distilled water and sodium bicarbonate (baking soda) 10%soda 90% water, putting it into the circuit, running the engine for about one hour at idle with some acceleration sometimes, then flush out with water, and replace fluid with a good coolant.
I suggest the Fiat Paraflu11, it is one of the best coolant.
El_Ventu- Centurion
- Posts : 221
Join date : 2012-10-07
Re: reasons why my hijet was over heating, 1... 2... 3... 4... and more!
![]() by stevelav Sat Nov 03, 2012 7:11 pm
by stevelav Sat Nov 03, 2012 7:11 pm
I imagine that flushing with water involves sticking a running hose pipe in your radiator while your engine ticks over and I guess another point in the system at the bottom prob a drainage plug must be open to let out the dirty water?
Is there any danger of overheating the engine or ruining your water pump while you do this?
stevelav- Centurion
- Posts : 137
Join date : 2011-09-17
Re: reasons why my hijet was over heating, 1... 2... 3... 4... and more!
![]() by Logi Sat Nov 03, 2012 7:17 pm
by Logi Sat Nov 03, 2012 7:17 pm
Logi- Jet Warrior
- Posts : 3662
Join date : 2011-04-07
Age : 88
Location : Kilmarnock
Re: reasons why my hijet was over heating, 1... 2... 3... 4... and more!
![]() by elfin girl Sun Nov 04, 2012 2:25 am
by elfin girl Sun Nov 04, 2012 2:25 am
elfin girl- Cinquecento
- Posts : 919
Join date : 2012-09-12
Age : 51
Location : hoddesdon
Re: reasons why my hijet was over heating, 1... 2... 3... 4... and more!
![]() by stevelav Sun Nov 04, 2012 1:55 pm
by stevelav Sun Nov 04, 2012 1:55 pm
What does Mr Logi say to that?
Hopefully I don't need to take anything off as currently its working fine so should flush easily (I hope)
stevelav- Centurion
- Posts : 137
Join date : 2011-09-17
Re: reasons why my hijet was over heating, 1... 2... 3... 4... and more!
![]() by stevelav Sun Nov 04, 2012 2:00 pm
by stevelav Sun Nov 04, 2012 2:00 pm
Bars Flush Cooling System Cleaner
The Bars Flush Cooling System Cleaner removes limescale, rust and sludge, improving performance and maintaining the cooling system. Simply add to your radiator system, treats cooling systems up to 17 litres.
is probably ok for £5
stevelav- Centurion
- Posts : 137
Join date : 2011-09-17
Re: reasons why my hijet was over heating, 1... 2... 3... 4... and more!
![]() by stevelav Sun Nov 04, 2012 2:09 pm
by stevelav Sun Nov 04, 2012 2:09 pm
stevelav- Centurion
- Posts : 137
Join date : 2011-09-17
Re: reasons why my hijet was over heating, 1... 2... 3... 4... and more!
![]() by elfin girl Sun Nov 04, 2012 2:26 pm
by elfin girl Sun Nov 04, 2012 2:26 pm
Some of the small pipes seem to be there to allow any air bubbles to work their way to the expansion pipe quicker I don't think they will all have a great deal of water flow through them in normal use or when system is flushed, water will always take the easiest route which these pipes are not necceserily
however if your sure they are not starting to get blocked already then keeping it clean should prevent it happening! If your coolant water in the system looks clean they might be ok (if dirty stuf has already been flushed out and replaced with clean then maybe not!)
Only sure way of knowing is having a look
elfin girl- Cinquecento
- Posts : 919
Join date : 2012-09-12
Age : 51
Location : hoddesdon
Re: reasons why my hijet was over heating, 1... 2... 3... 4... and more!
![]() by elfin girl Sun Nov 04, 2012 2:30 pm
by elfin girl Sun Nov 04, 2012 2:30 pm
Some of the rads don't have a plug on the bottom of them either
elfin girl- Cinquecento
- Posts : 919
Join date : 2012-09-12
Age : 51
Location : hoddesdon
Re: reasons why my hijet was over heating, 1... 2... 3... 4... and more!
![]() by stevelav Sun Nov 04, 2012 2:38 pm
by stevelav Sun Nov 04, 2012 2:38 pm
I don't think I'll start messing with the little pipe until I know there is a problem, I've got so many jobs to do ...
stevelav- Centurion
- Posts : 137
Join date : 2011-09-17
Sponsored content
Page 1 of 3 • 1, 2, 3 ![]()
» over heating
» New member 1.3 vs 1.0
» Over heating and We don't know what else to try?!
» Over heating
|
|
|