
The Renovation of Skylark
Page 2 of 5 •  1, 2, 3, 4, 5
 ![]()
Re: The Renovation of Skylark
![]() by Raggy Sun Mar 13, 2016 7:55 pm
by Raggy Sun Mar 13, 2016 7:55 pm

Taking the old roof lining off, top surface was easy but the foam scrim backing was a pain
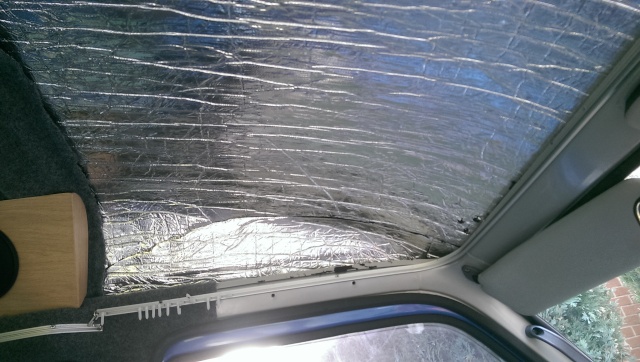
Sound/insulation put on he roof, might as well as I had some left and I had gone this far.
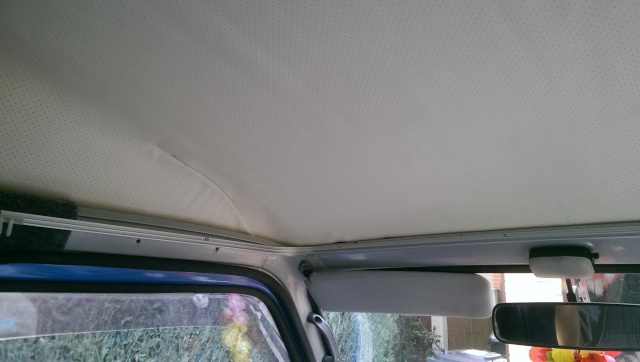
New perforated ivory headlining on, it was a one chance job with the spray glue as once it grabs there is no going back! (Unless you want to destroy it!). Not too bad a job, not perfect but cleaner than the last one and wife happy now.

Last but not least a new set of seats for the front, Smart car seats and not bad for £40 for the pair, not a mark on them and the blue matches perfectly

Raggy- Jet Addict
- Posts : 1630
Join date : 2015-05-25
Age : 60
Location : Doncaster
Re: The Renovation of Skylark
![]() by HighlyJetted Sun Mar 13, 2016 10:12 pm
by HighlyJetted Sun Mar 13, 2016 10:12 pm

HighlyJetted- Hijet Overdose
- Posts : 5595
Join date : 2009-10-06
Age : 41
Location : Cheshire -

Re: The Renovation of Skylark
![]() by obelisk Wed Mar 16, 2016 5:24 pm
by obelisk Wed Mar 16, 2016 5:24 pm
Have you tried Goo Gone to remove the duct tape..?maralions wrote:Cool. Are you still intending to sleep two, i.e. one on the original higher bench behind the driver and then that wider one underneath? How does it work with the little seat behind the passenger being higher? It looks like a good modification. I'm thinking about replacing the tops of all the boxes to look nicer as someone's put some 15 year old duct tape on and I can't get the bloody stuff off. Actually seems easier (and more sensible) to remake the old ones with nicer tops. I'm really tempted to remake the whole thing out of lighter stuff but again it's getting the whole set up out including the wired in cooker and sink that puts me off.
I also really wanted to make it into a double sleeper instead of two separate singles but couldn't find a way to make it work - can't lower the driver bit because of the gas bottle and and can't bring the passenger one up because then there'd be no leg room under the cooker.
obelisk- Clubman
- Posts : 33
Join date : 2016-03-16
Re: The Renovation of Skylark
![]() by Raggy Tue Mar 22, 2016 1:50 pm
by Raggy Tue Mar 22, 2016 1:50 pm

Fitting was easy, longest time was measuring where the rails had to go. Some others have had to 'modify' the drivers engine cover but for whatever reason I didnt need to. A nice driving position now (wasnt that bad before though). Best £40 spent so far.

Looking just as good from behind.
Next is the rear interior and bought the curtain material yesterday so will be breaking out the sewing machine After that.
Not had as much fun in a long while! (Sure that says something about my life! Suppose I'm easily pleased.
One more item thats due to arrive is this:

As I needed to redo the leasure electrics thought why not go the whole hog and do it right (www.switchpanel.co.uk) Electrics not my best skill so leaving that till the end as much as I can then I can just concentrate on that but some holes etc have to be done ready hence me getting it now. Summer is fast approaching and wife niw wondering if it will be ready and what she let herself in for so suppose I had better pull my finger out and get a move on!
Raggy- Jet Addict
- Posts : 1630
Join date : 2015-05-25
Age : 60
Location : Doncaster
Re: The Renovation of Skylark
![]() by danielfrisbee Tue Mar 22, 2016 2:40 pm
by danielfrisbee Tue Mar 22, 2016 2:40 pm

danielfrisbee- Chatterbox
- Posts : 82
Join date : 2016-01-12
Location : london
Re: The Renovation of Skylark
![]() by Raggy Tue Mar 22, 2016 3:43 pm
by Raggy Tue Mar 22, 2016 3:43 pm
Raggy- Jet Addict
- Posts : 1630
Join date : 2015-05-25
Age : 60
Location : Doncaster
Re: The Renovation of Skylark
![]() by Raggy Fri Mar 25, 2016 9:18 pm
by Raggy Fri Mar 25, 2016 9:18 pm

This is how it starts, one 8x4 sheet of lightweight Vohringer ply

Not bad to cut, just been using a jigsaw and a good eye to follow a pencil line

All cut, trimmed with T edging where required and drilled. Now which bit goes where?

Drilled it as per original using pocket holes, makes it much neater and stronger joints apparently.
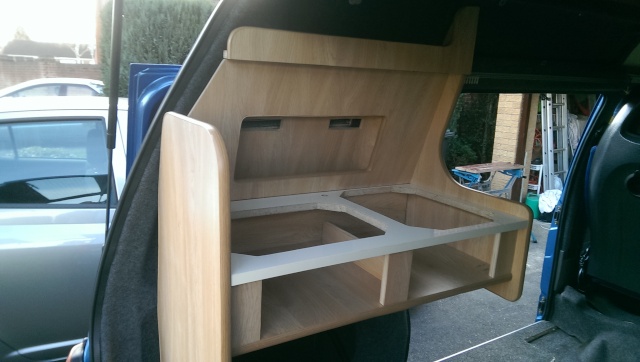
Nearly there, just drawer fronts to sort then install hob, sink and connect it up.
Raggy- Jet Addict
- Posts : 1630
Join date : 2015-05-25
Age : 60
Location : Doncaster

xxemaphorr- Centurion
- Posts : 177
Join date : 2010-04-08
Age : 39
Location : Scunthorpe
Re: The Renovation of Skylark
![]() by elfin girl Sat Mar 26, 2016 5:11 pm
by elfin girl Sat Mar 26, 2016 5:11 pm

elfin girl- Cinquecento
- Posts : 919
Join date : 2012-09-12
Age : 51
Location : hoddesdon
Re: The Renovation of Skylark
![]() by Raggy Sat Mar 26, 2016 5:48 pm
by Raggy Sat Mar 26, 2016 5:48 pm
Raggy- Jet Addict
- Posts : 1630
Join date : 2015-05-25
Age : 60
Location : Doncaster
Re: The Renovation of Skylark
![]() by Raggy Sat Apr 02, 2016 1:03 pm
by Raggy Sat Apr 02, 2016 1:03 pm

Raggy- Jet Addict
- Posts : 1630
Join date : 2015-05-25
Age : 60
Location : Doncaster

Logi- Jet Warrior
- Posts : 3662
Join date : 2011-04-07
Age : 88
Location : Kilmarnock
HighlyJetted- Hijet Overdose
- Posts : 5595
Join date : 2009-10-06
Age : 41
Location : Cheshire -
Re: The Renovation of Skylark
![]() by Raggy Mon Apr 18, 2016 10:15 pm
by Raggy Mon Apr 18, 2016 10:15 pm

Thats the water tank box under the cooker unit (got to pipe it up yet)

Seat/storage unit starting to come together, its now back to just above original height and more comfortable to sit on now. The originals that were there had been cut down to much lower and sitting was far too low to be comfortable and no use at the table. Only thing it allwaed was a full width bed but as its mainly a day van for us, seating height is more important.
Raggy- Jet Addict
- Posts : 1630
Join date : 2015-05-25
Age : 60
Location : Doncaster
Re: The Renovation of Skylark
![]() by sputnik Mon Apr 18, 2016 11:20 pm
by sputnik Mon Apr 18, 2016 11:20 pm
sputnik- Centurion
- Posts : 122
Join date : 2014-11-13
Re: The Renovation of Skylark
![]() by Guest Tue Apr 19, 2016 12:26 am
by Guest Tue Apr 19, 2016 12:26 am
That is superb workmanship Raggy.
Guest- Guest
Re: The Renovation of Skylark
![]() by Logi Tue Apr 19, 2016 6:10 am
by Logi Tue Apr 19, 2016 6:10 am
Hope you're keeping a set of templates...
Logi- Jet Warrior
- Posts : 3662
Join date : 2011-04-07
Age : 88
Location : Kilmarnock
Re: The Renovation of Skylark
![]() by Raggy Tue Apr 19, 2016 7:10 am
by Raggy Tue Apr 19, 2016 7:10 am
Raggy- Jet Addict
- Posts : 1630
Join date : 2015-05-25
Age : 60
Location : Doncaster
Re: The Renovation of Skylark
![]() by maralions Tue Apr 19, 2016 8:04 am
by maralions Tue Apr 19, 2016 8:04 am
maralions- Chatterbox
- Posts : 79
Join date : 2015-11-12
Age : 38
Re: The Renovation of Skylark
![]() by Raggy Tue Apr 19, 2016 8:27 am
by Raggy Tue Apr 19, 2016 8:27 am
Raggy- Jet Addict
- Posts : 1630
Join date : 2015-05-25
Age : 60
Location : Doncaster
Re: The Renovation of Skylark
![]() by maralions Tue Apr 19, 2016 9:53 am
by maralions Tue Apr 19, 2016 9:53 am
Do you think regular 10mm ply would do or too thin?
maralions- Chatterbox
- Posts : 79
Join date : 2015-11-12
Age : 38
Re: The Renovation of Skylark
![]() by Raggy Tue Apr 19, 2016 10:14 am
by Raggy Tue Apr 19, 2016 10:14 am
Raggy- Jet Addict
- Posts : 1630
Join date : 2015-05-25
Age : 60
Location : Doncaster
Re: The Renovation of Skylark
![]() by maralions Tue Apr 19, 2016 10:26 am
by maralions Tue Apr 19, 2016 10:26 am
maralions- Chatterbox
- Posts : 79
Join date : 2015-11-12
Age : 38
Re: The Renovation of Skylark
![]() by Raggy Tue Apr 19, 2016 9:27 pm
by Raggy Tue Apr 19, 2016 9:27 pm
Raggy- Jet Addict
- Posts : 1630
Join date : 2015-05-25
Age : 60
Location : Doncaster
Re: The Renovation of Skylark
![]() by Guest Wed Apr 20, 2016 7:07 am
by Guest Wed Apr 20, 2016 7:07 am

isnt there somebody on here who would like that??
Guest- Guest
Re: The Renovation of Skylark
![]() by Raggy Sat Apr 23, 2016 6:32 pm
by Raggy Sat Apr 23, 2016 6:32 pm


Raggy- Jet Addict
- Posts : 1630
Join date : 2015-05-25
Age : 60
Location : Doncaster
Re: The Renovation of Skylark
![]() by Raggy Sun Apr 24, 2016 9:30 pm
by Raggy Sun Apr 24, 2016 9:30 pm


Now to look at the small seat/storage unit that fits behind the passenger seat, also acts as end of passenger side bed area. Getting there but summer comming up quickly and so many little jobs to finish off. Next trip out is Whitby in a couple of weeks, not camping in it but a good trip out over North Yorkshire Moors.
Raggy- Jet Addict
- Posts : 1630
Join date : 2015-05-25
Age : 60
Location : Doncaster
Re: The Renovation of Skylark
![]() by HighlyJetted Sun Apr 24, 2016 9:49 pm
by HighlyJetted Sun Apr 24, 2016 9:49 pm
HighlyJetted- Hijet Overdose
- Posts : 5595
Join date : 2009-10-06
Age : 41
Location : Cheshire -
Re: The Renovation of Skylark
![]() by maralions Sun Apr 24, 2016 9:50 pm
by maralions Sun Apr 24, 2016 9:50 pm
maralions- Chatterbox
- Posts : 79
Join date : 2015-11-12
Age : 38
Page 2 of 5 • 1, 2, 3, 4, 5 ![]()
» Skylark and the cat...
» Up with the Skylark
» Skylark Spoiler
» Facelift for Skylark
|
|
|